
How to Add a Product to Your Shopify Store
in Shopify, Shopify Customization on September 11, 2024by Mosfequr RahmanAdding products to your Shopify store is a key part of setting up your online business. Whether you’re starting a new store or expanding your product range, it’s important to know how to add and manage products effectively. In this guide, we’ll show you how to add a product to your Shopify store, from entering details and uploading images to setting prices and managing inventory. By following these steps, you’ll make sure your products are well-presented and easy for customers to find, helping you boost sales and grow your business.
Table of Contents
The product page in your Shopify store is essential for your online business’s success. It’s where customers decide whether to buy your product, so making a great first impression is key. A well-designed product page provides clear information, such as descriptions, features, pricing, and availability, helping customers make informed decisions. High-quality images and customer reviews build trust, while an optimized page improves your search engine ranking, bringing more visitors to your store. The layout and content also impact how many visitors become buyers, making it important to create a user-friendly experience. Additionally, the product page offers chances to suggest related products, boosting sales. In short, the product page is crucial for attracting, informing, and converting customers, helping your Shopify store grow.
Add a Product Step by Step
Step 1: Log in to Your Shopify Admin
Go to Shopify and log in with your credentials.
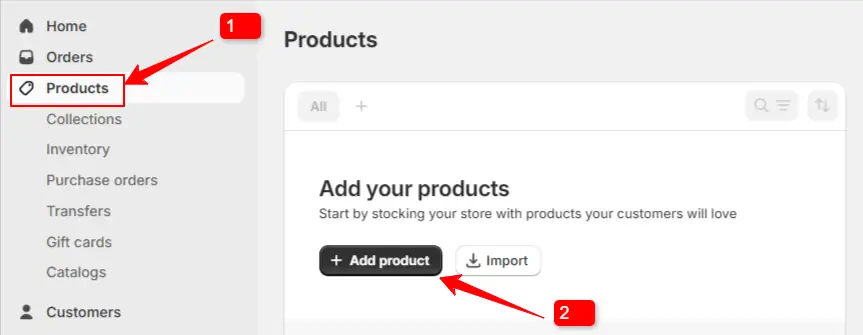
Step 2: Go to the Products Section
- From your Shopify admin, click Products.
- Click the Add product button.
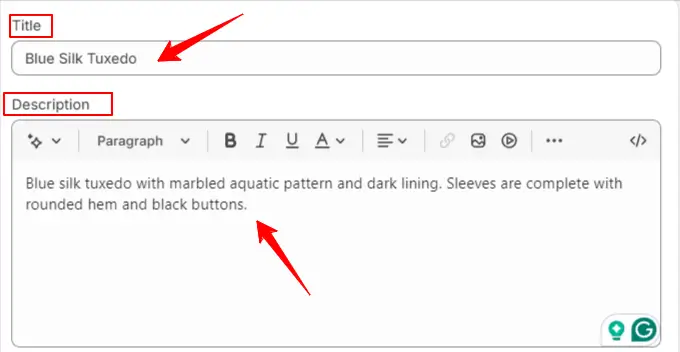

Step 3: Product Title and Description
- Title: Enter the name of your product.
- Description: Write a detailed description of your product. You can use the rich text editor to format your text, add images, or embed videos
- Click Save to apply the changes..

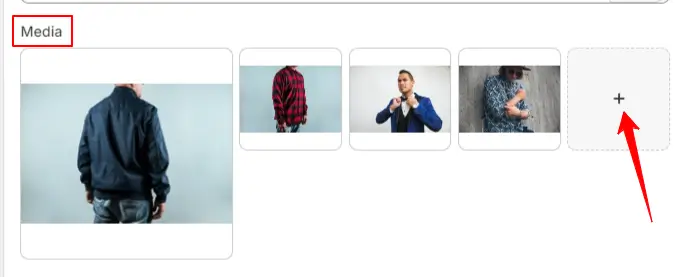
Step 4: Upload Images
Upload or drag and drop your product media, such as images, videos, 3D models, and files, to highlight what you’re selling. These visuals are key to capturing visitors’ attention and keeping them engaged on your site.
Product media, especially images, play a major role in influencing customers’ buying choices. A great product image helps them visualize the item, even without physically experiencing it.
Upload images of your product. You can drag and drop images or click the Upload new button to upload from your computer.
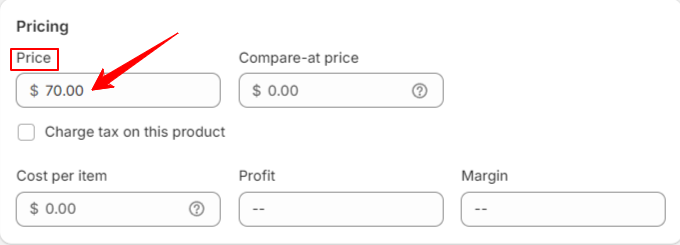
Step 5: Enter Pricing
Set your product price and compare-at price (if applicable). You can also enter the cost per item to track profit margins.
Make sure your prices align with your brand’s positioning. When deciding on prices, don’t forget to consider discounts. Shopify lets you control when customers can use discount codes. For instance, if they purchase a certain number of items, the discount code can be automatically applied.
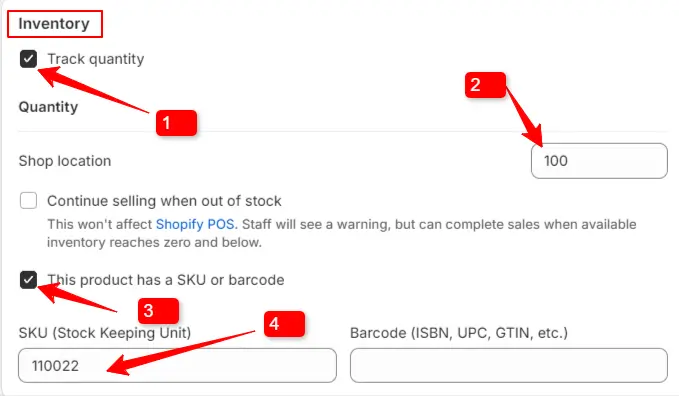
Step 6: Add Inventory
Enter your product’s SKU (Stock Keeping Unit) and barcode if available. You can also track inventory and specify the quantity available.
- Check the box to enable Tracking quantity.
- Enter the quantity of your product as a numeric value.
- Check the box to enable SKU or Barcode.
- Enter the SKU or Barcode information.
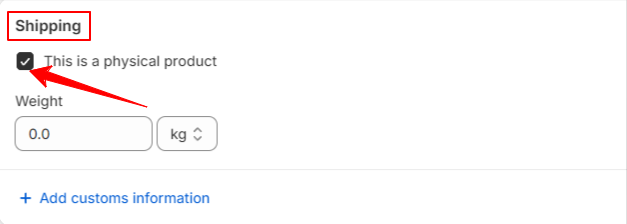
Step 7: Shipping
Check the option if your product requires shipping. Enter the product’s weight and customs information if necessary.
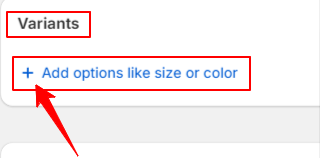
Step 8: Variants
If your product has different options (like size or color), you can add variants. Click Add options like size or color and fill in the details for each variant.
To learn more about product variants, please refer to the article below.
How to Add Product Variants in Shopify
For detailed information on Bulk Edit Variants in Shopify
How to Bulk Edit Variants in Shopify
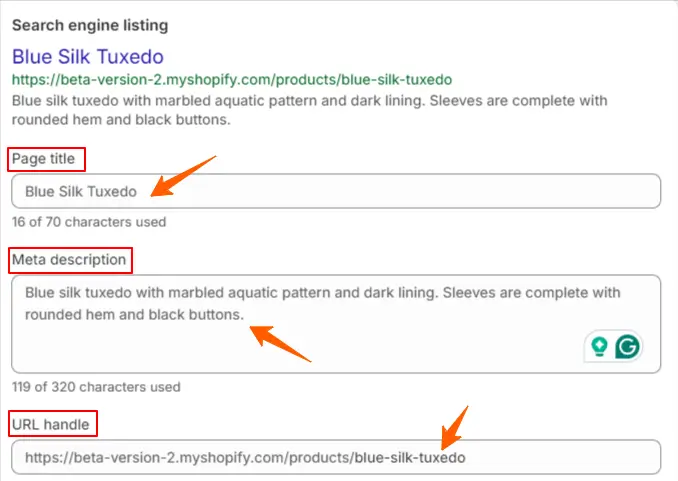
Step 9: SEO
Enhancing your store’s SEO is essential for improving its visibility on search engine results pages and driving more traffic to your online store.
Don’t forget about the search engine listing section when updating the product settings. In your search engine listing settings, you can update three key fields. By default, these fields automatically pull information from your product details.
Edit the search engine listing preview to improve SEO. You can change the Page title, Meta description, and URL handle.The Benefits of Optimizing Your Search Engine Listing Preview:
- Enhanced Visibility and Higher Click-Through Rates: Improving your listing helps it stand out in search results, leading to more clicks.
- A Strong First Impression: A well-crafted preview provides a clear and engaging introduction to attract potential customers.
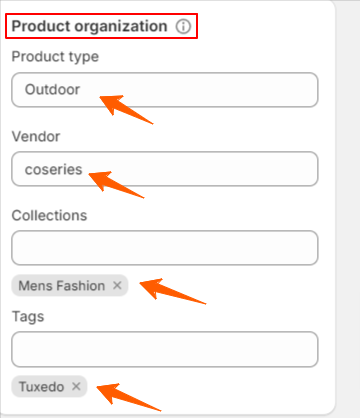
Step 10: Product organization
Assign your product to a collection, add tags, and set the vendor and product type to keep your store organized.
Product type categorizes the items you’re selling, helping organize your store and making it easier for customers to find what they’re looking for. This can also affect how products appear in the main menu.
Vendor refers to the product’s brand or manufacturer, useful for brand-loyal customers.
Shopify collections group-related products, like ‘Summer Sale’ or ‘New Arrivals,’ allow easier navigation and product discovery.
Tags are keywords that improve internal organization, filtering, and search optimization for your store.

Step 11: Set Product Status
- Active: The product will be visible and purchasable in your store.
- Draft: The product will be saved as a draft and won’t be visible in your store.

Step 12: Save Your Product
Click the Save button to apply your changes.

After adding your product, it’s important to visit the product page on your live website to confirm that everything is displayed correctly. Check that the product images, descriptions, pricing, and any other details appear as intended. This ensures that your customers will have a smooth and professional shopping experience when they view the product.
In summary, adding products to your Shopify store is essential for your online business. By entering accurate details, uploading good images, setting the right prices, and managing inventory, you make sure your products are easy for customers to find and buy. Doing this carefully will help your store run smoothly, improve the shopping experience, and support your business growth. With the steps in this guide, you’re ready to build a successful and organized Shopify store.
We hope that you find this article helpful! You can follow more Shopify articles given below
How to Add a Category in Shopify by Creating a Collection
How to Add Products to Multiple Locations in Shopify
How to Add or Remove Shopify Product Sale Badge[No App Required]


