How to Add or Remove Shopify Product Sale Badge[No App Required]
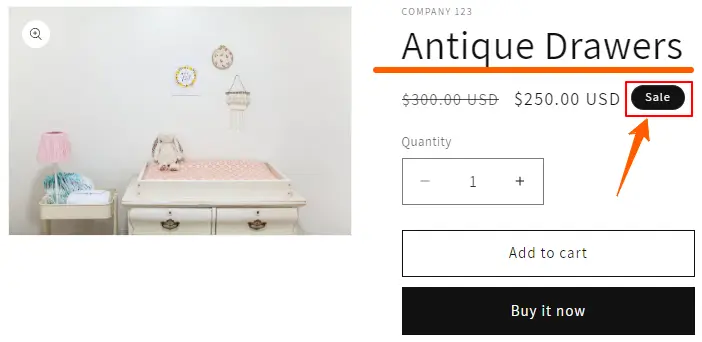
in Shopify, Shopify Customization on July 28, 2024by Mosfequr RahmanDo you have products on sale and want to spotlight Shopify Product Sale Badge on your website? Creating a Shopify Product Sale Badge that makes your promotional items stand out is simple. These badges are designed to catch the eye of your visitors, making it easier for customers to find the best deals. By featuring these sale items prominently, you can attract more attention and encourage potential buyers to take advantage of your special offers.
If an on-sale product has only one variant, a specific Sale badge is displayed. However, if the product has multiple variants, such as Size M and Color Red, a general “Sale” label will appear instead. In this case, you’ll need to set the discount for each specific product variant.
How to Add or Remove Shopify Product Sale Badge
Add a Shopify product sale badge: Step-by-Step Approach
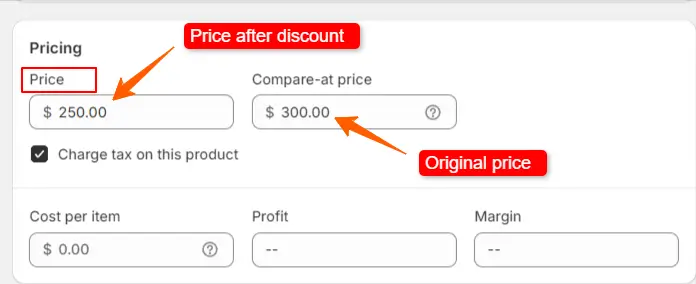
To display a Shopify Product Sale Badge on Shopify, you need to enter both the original selling price and the discounted price. This information allows Shopify to calculate and show the discount to your customers, making it clear which items are on sale.
Step 1: Log in to Your Shopify Admin
First, log in to your Shopify admin dashboard using your credentials.

Step 2: Select the product
In your Shopify Admin dashboard, go to Products and choose the product you want to add the sale badge to
- First, click on Products
- Then click on a product you want to add the Shopify product sale badge.

Step 3: Enter the original price and the discount price
In the product settings, go to Pricing and enter the original price in the ‘Compare-at Price‘ box and the discounted price in the ‘Price‘ box. This will enable the sale badge.
- Enter the original price.
- Enter the discounted price.
NB: If your product has multiple variants, you will need to click on each variant to access its Pricing settings. Within this section, you should enter the original price in the appropriate field and ensure it is higher than the discounted price. This setup allows Shopify to properly display the sale badge for each variant, clearly showing the discount to your customers.

Afterward, click the Save button to apply your changes.

Visit the product page on the live website to ensure that the sale badge is displayed on the product.
Remove a product sale badge: Step-by-Step Approach
To remove the sale badge, you do as follows:
Step 1: Log in to Your Shopify Admin
First, log in to your Shopify admin dashboard using your credentials.

Step 2: Select the product
In your Shopify Admin dashboard, go to Products and choose the product you want to remove the sale badge to
- First, click on Products
- Then click on a product you want to remove the sale badge.

Step 3: Remove Sale Badge
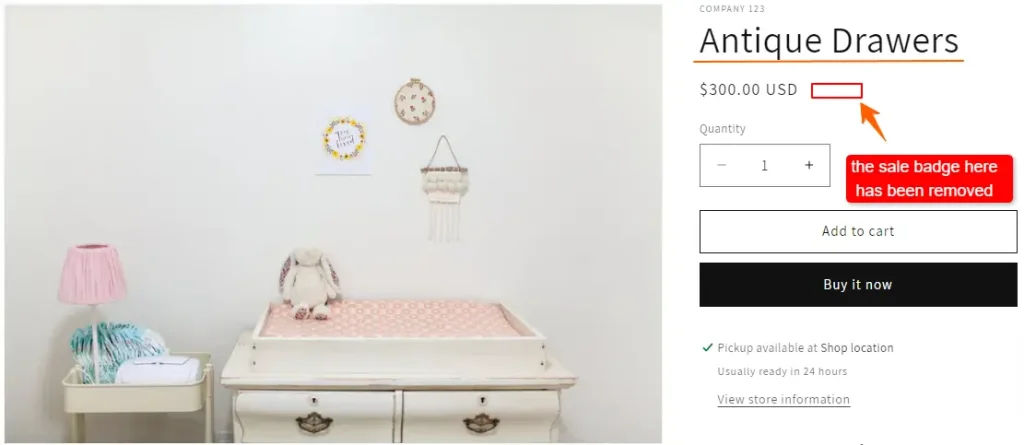
Go to ‘Pricing’ and enter the original price in the ‘Price’ box in the product settings. This will disable the sale badge.

Afterward, click the Save button to apply your changes.

Visit the product page on the live website to ensure that the sale badge is removed from the product.
Why should I use a sale badge on my Shopify products?
A sale badge makes discounted products stand out, grabs attention, and encourages customers to buy quickly. It also helps show which items are on sale, building trust and boosting sales.
How do I add a sale badge to my products in Shopify?
You can add a sale badge using Shopify’s built-in features or a third-party app from the Shopify App Store that lets you customize and display sale badges on your product images.
Can I customize the sale badge?
Yes, you can customize the sale badge’s color, text, and position to match your store’s style using Shopify’s theme editor or a third-party app.
Why is a Sale Badge Important for Shopify Products?
A sale badge is important because it makes discounted products stand out, catching shoppers’ eyes. It creates a sense of urgency, encouraging customers to buy before the deal ends. By clearly showing which items are on sale, it helps build trust and makes it easier for customers to find great deals, which can increase sales and improve their shopping experience.
In summary, adding or removing sale badges on your product listings is simple and can greatly influence your sales and customer experience. By following the steps provided, you can quickly update these badges to match your current promotions or pricing changes. Keeping your sale badges up-to-date ensures that your customers always have the right information and can benefit from your special offers. Whether you’re showcasing a new discount or resetting a product to its regular price, managing sale badges effectively is key to running a successful online store.
To understand the process of adding products, check the article linked below.
How to Add a Product to Your Shopify Store
We hope that you find this article helpful! You can follow more Shopify articles given below
How to Add Products to Multiple Locations in Shopify
How to Add a Category in Shopify by Creating a Collection


